QuickStart
Notes and Update
- This QuickStart guide provides a high level walkthrough of harvesting records from static files, transforming those records with XSLT, and publishing via Combine’s built-in OAI server.
- As of 9/20/2018, with
v0.3on the horizon for release, this quickstart is becoming very outdated. Goal is to update soon, but in the interim, proceed at your own peril!
Overview
Sometimes you can’t beat kicking the tires to see how an application works. This “QuickStart” guide will walkthrough the harvesting, transforming, and publishing of metadata records in Combine, with some detours for explanation.
Demo data from unit tests will be reused here to avoid the need to provide actual OAI-PMH endpoints, Transformation or Validation scenarios, or other configurations unique to a DPLA Service Hub.
This guide will walk through the following areas of Combine, and it’s recommended to do so in order:
- sshing into server
- python environment
- starting / stopping Combine
- Combine data model
- Organizations, RecordGroups, Jobs, Records
- configuration
- setting up OAI-PMH endpoints
- creating Transformation Scenarios
- creating Validation Scenarios
- harvesting Records
- transforming Records
- looking at Jobs and Records
- duplicating / merging Jobs
- publishing Records
- analysis jobs
- troubleshooting
For simplicity’s sake, we will assume Combine is installed on a server
with the domain name of combine, though likely running at the IP
192.168.45.10, which the Ansible/Vagrant install from
Combine-Playbook
defaults to. On most systems you can point that IP to a domain name like
combine by modifying your /etc/hosts file on your local machine.
Note: combine and 192.168.45.10 might be used
interchangeably throughout.
SSHing into server
The most reliable way is to ssh in as the combine user (assuming
server at 192.168.45.10), password is also combine:
# username/password is combine/combine
ssh combine@192.168.45.10
You can also use Vagrant to ssh in, from the Vagrant directory on the host machine:
vagrant ssh
If using Vagrant to ssh in, you’ll want to switch users and become
combine, as most things are geared for that user.
Combine python environment
Combine runs in a Miniconda python environement, which can be activated from any filepath location by typing:
source activate combine
Note: Most commands in this QuickStart guide require you to be in this environment.
Starting / Stopping Combine
Gunicorn
For normal operations, Combine is run using
Supervisor, a python based application for
running system processes. Specifically, it’s running under the Python
WSGI server Gunicorn, under the supervisor
program named gunicorn.
Start Combine:
sudo supervisorctl start gunicorn
Stop Combine:
sudo supervisorctl stop gunicorn
You can confirm that Combine is running by visiting
http://192.168.45.10/combine, where
you should be prompted to login with a username and password. For
default/testing installations, you can use combine / combine for
these credentials.
Django runserver
You can also run Combine via Django’s built-in server.
Convenience script, from /opt/combine:
./runserver.sh
Or, you can run the Django command explicitly from /opt/combine:
./manage.py runserver --noreload 0.0.0.0:8000
You can confirm that Combine is running by visiting
http://192.168.45.10:8000/combine (note the 8000 port number).
Livy Sessions
To run any Jobs, Combine relies on an active (idle) Apache Livy session. Livy is what makes running Spark jobs possible via the familiar request/response cycle of a Django application.
Currently, users are responsible for determining if the Livy session is ready, though there are plans to have this automatically handled.
To check and/or start a new Livy session, navigate to:
http://192.168.45.10/combine/system. The important column is
status which should read idle. If not, click Stop or
Remove under the actions column, and once stopped, click the
start new session link near the top. Takes anywhere from 10-20
seconds to become idle.

Livy session page, with no active Livy session
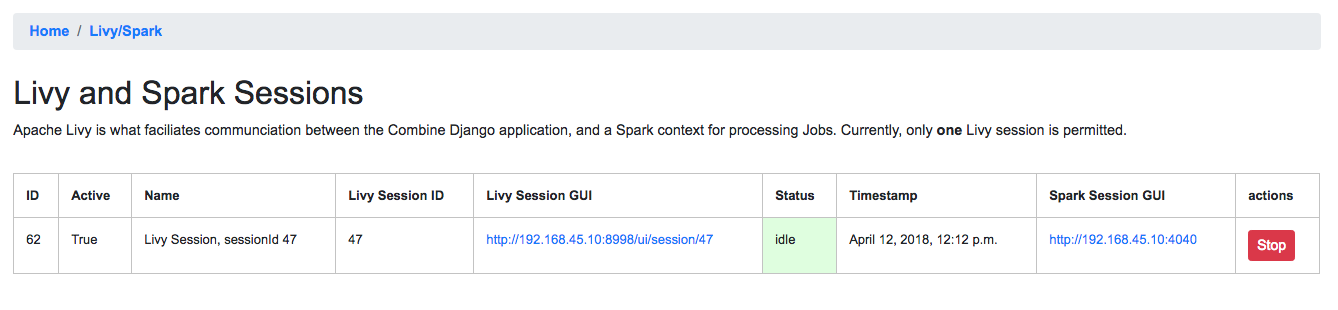
Idle Livy session
You can check the status of the Livy session at a glance from the
Combine navigation, where Livy/Spark next to System should have a green background if active.
Combine Data Model
Organization
The highest level of organization in Combine is an Organization. Organizations are intended to group and organize records at the level of an institution or organization, hence the name.
You can create a new Organization from the Organizations page at Organizations page, or by clicking “Organizations” from navigation links at the top of any page.
For this walkthrough, we can create one with the name “Amazing
University”. Only the name field is required, others are optional.
RecordGroup
Within Organizations are RecordGroups. RecordGroups are a “bucket” at the level of a bunch of intellectually similar records. It is worth noting now that a single RecordGroup can contain multiple Jobs, whether they are failed or incomplete attempts, or across time. Suffice it to say for now that RecordGroups may contain lots of Jobs, which we will create here in a minute through harvests, transforms, etc.
For our example Organization, “Amazing University”, an example of a
reasonable RecordGroup might be this fictional University’s Fedora
Commons based digital repository. To create a new RecordGroup, from the
Organizations page,
click on the Organization “Amazing University” from the table. From the
following Organiation page for “Amazing University” you can create a new
RecordGroup. Let’s call it “Fedora Repository”; again, no other fields
are required beyond name.

Demo Organization “Amazing University” and demo Record Group “Fedora Repository”
Finally, click into the newly created RecordGroup “Fedora Repository” to see the RecordGroup’s page, where we can begin to run Jobs.
Jobs
Central to Combine’s workflow philosophy are the ideas of Jobs. Jobs include any of the following:
- Harvest (OAI-PMH, static XML, and others to come)
- Transform
- Merge/Duplicate
- Publish
- Analysis
Within the context of a RecordGroup, one can think of Jobs as “stages” of a group of records, one Job serving as the input for the next Job run on those records. i.e.
OAI-PMH Harvest Job ---> XSLT Transform Job --> Publish Job
Record
Lastly, the most granular major entity in Combine is an individual Record. Records exist within a Job. When a Job is deleted, so are the Records (the same can be said for any of these hierarchies moving up). Records will be created in the course of running Jobs.
Briefly, Records are stored in MySQL, and are indexed in ElasticSearch. In MySQL, you will find the raw Record XML metadata, and other information related to the Record throughout various stages in Combine. In ElasticSearch, you find an flattened, indexed form of the Record’s metadata, but nothing much more. The representation of a Record in ElasticSearch is almost entirely for analysis and search, but the transactional nature of the Record through various stages and Jobs in Combine is the Record as stored in MySQL.
It is worth noting, though not dwelling on here, that groups of Records are also stored as Avro files on disk.
Configuration and Scenarios
Combine relies on users coniguring “scenarios” that will be used for things like transformations, validations, etc. These can be viewed, modified, and tested in the Configuration page. This page includes the following main sections:
- Field Mapper Configurations
- OAI-PMH endpoints
- Transformation Scenarios
- Validation Scenarios
- Record Identifier Transformation Scenarios
- DPLA Bulk Data Downloader
For the sake of this QuickStart demo, we can bootstrap our instance of Combine with some demo configurations, creating the following:
- Transformation Scenario
- “MODS to Service Hub profile” (XSLT transformation)
- Validation Scenarios
- “DPLA minimum” (schematron validation)
- “Date checker” (python validation)
To boostrap these demo configurations for the purpose of this
walkthrough, run the following command from /opt/combine:
./manage.py quickstartbootstrap
You can confirm these demo configurations were created by navigating to the configuration screen at http://192.168.45.10/combine/configurations.
Harvesting Records
Static XML harvest
Now we’re ready to run our first Job and generate our first Records. For this QuickStart, as we have not yet configured any OAI-PMH endpoints, we can run a static XML harvest on some demo data included with Combine.
From the RecordGroup screen, near the bottom and under “Harvest”, click “Static XML”.

Area to initiate new Jobs from the Record Group page
You will be presented with a screen to run a harvest job of static XML files from disk:
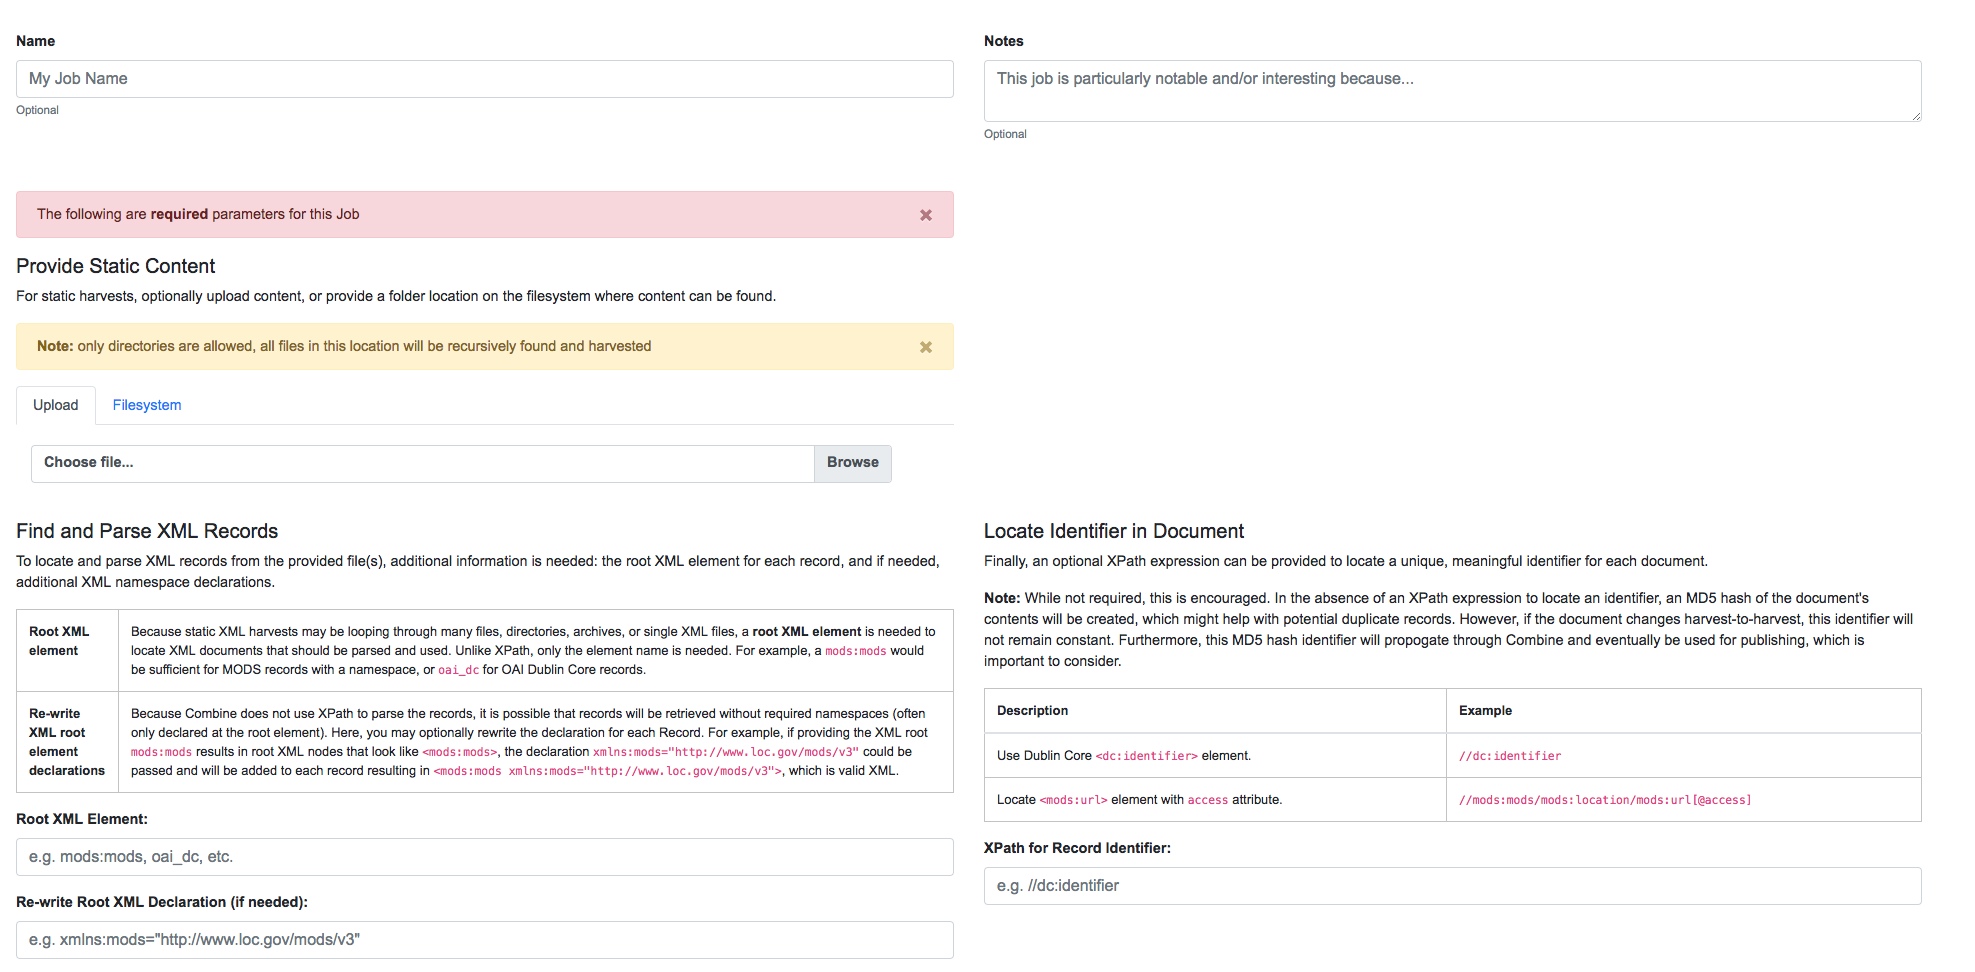
Static Harvest Job screen
Many fields are optional – e.g. Name, Description – but we will need to tell the Harvest Job where to find the files.
First, click the tab “Filesystem”, then for the form field
Location of XML files on disk:, enter the following, which points to
a directory of 250 MODS files (this was created during bootstrapping):
/tmp/combine/qs/mods
Next, we need to provide an XPath query that locates each discrete
record within the provided MODS file. Under the section “Find and Parse XML Records”, for the
form field Root XML Element, enter the following:
mods:mods
For the time being, we can ignore the section “Locate Identifier in Document” which would allow us to find a unique identifier via XPath in the document. By default, it will assign a random identifier based on a hash of the document string.
Next, we can apply some optional parameters that are present for all jobs in Combine. This looks like the following:

Optional Job parameters
Different parameter types can be found under the various tabs, such as:
- Field Mapping Configuration
- Validation Tests
- Transform Identifier
- etc.
Most of these settings we can leave as deafult for now, but one optional parameter we’ll want to check and set for this initial job are Validations to perform on the records. These can be found under the “Validation Tests” tab. If you bootstrapped the demo configurations from steps above, you should see two options, DPLA minimum and Date checker; make sure both are checked.
Finally, click “Run Job” at the bottom.
This should return you to the RecordGroup page, where a new Job has
appeared and is running under the Status column in the Job
table. A static job of this size should not take long, refresh the page
in 10-20 seconds, and hopefully, you should see the Job status switch to
available.
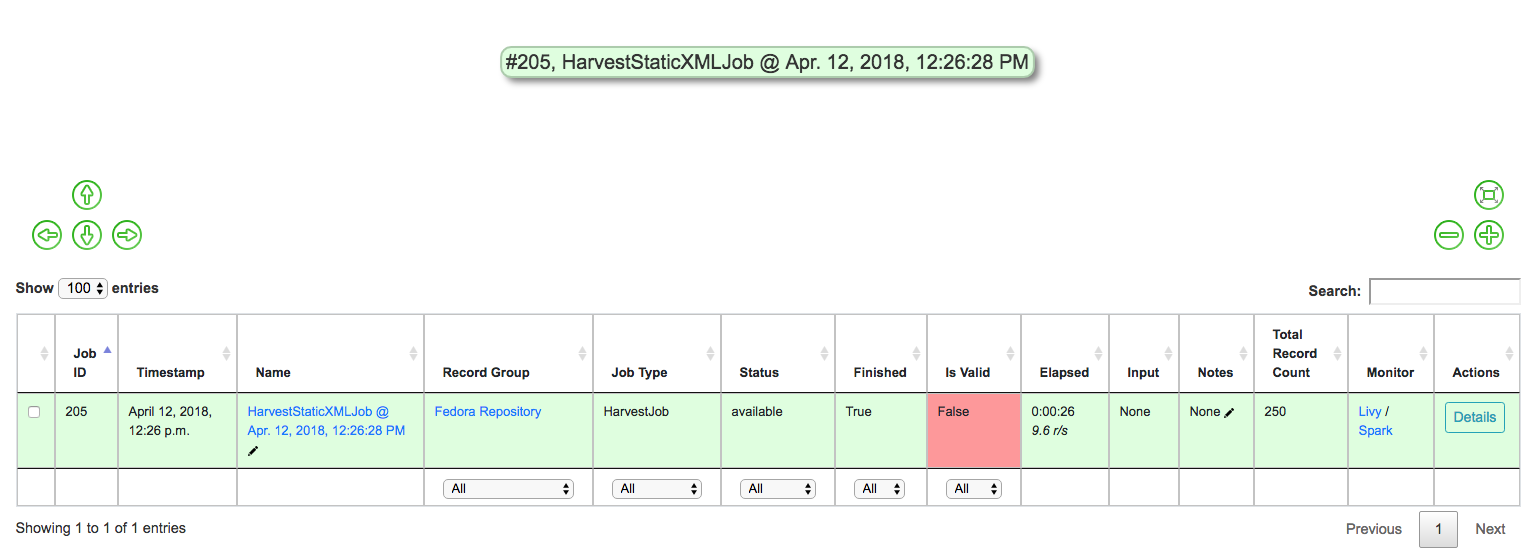
Status of Static Harvest job, also showing Job failed some Validations
This table represents all Jobs run for this RecordGroup, and will grow
as we run some more. You may also note that the Is Valid column is
red and shows False, meaning some records have failed the Validation
Scenarios we optionally ran for this Job. We will return to this later.
For now, let’s continue by running an XSLT Transformation on these records.
Transforming Records
In the previous step, we harvestd 250 records from a bunch of static MODS XML documents. Now, we will transform all the Records in that Job with an XSLT Transformation Scenario.
From the RecordGroup screen, click the “Transform” link at the bottom.
For a Transform job, you are presented with other Jobs from this RecordGroup that will be used as an input job for this Transformation.
Again, Job Name and Job Note are both optional. What is
required, is selecting what job will serve as the input Job for this
Transformation. In Combine, most Jobs take a previous job as an input,
essentially performing the current Job over all records from the
previous job. In this way, as Records move through Jobs, you get a
series of “stages” for each Record.
An input Job can be selected for this Transform Job by clicking the radio button next to the job in the table of Jobs (at this stage, we likely only have the one Harvest Job we just ran).

Input Job selection screen
Next, we must select a Transformation Scenario to apply to the records from the input Job. We have a Transformation Scenario prepared for us from the QuickStart bootstrapping, but this is where you might optionally select different transforms depending on your task at hand. While only one Transformation Scenario can be applied to a single Transform job, multiple Transformation Scenarios can be prepared and saved in advance for use by all users, ready for different needs.
For our purposes here, select MODS to Service Hub profile (xslt)
from the dropdown:

Select Transformation Scenario to use
Once the input Job (radio button from table) and Transformation Scenario (dropdown) are selected, we are presented with the same optional parameters as we saw in the previous, Harvest Job. We can leave the defaults again, double checking that the two Validation Scenarios – DPLA minimum and Date checker – are both checked under the “Validation Tests” tab.
When running Jobs, we also have the ability to select subsets of Records from input Jobs. Under the tab “Record Input Filter”, you can refine the Records that will be used in the following ways:
- Refine by Record Validity: Select Records based on their passing/failing of Validation tests
- Limit Number of Records: Select a numerical subset of Records, helpful for testing
- Refine by Mapped Fields: Most exciting, select subsets of Records based on an ElasticSearch query run against those input Jobs mapped fields
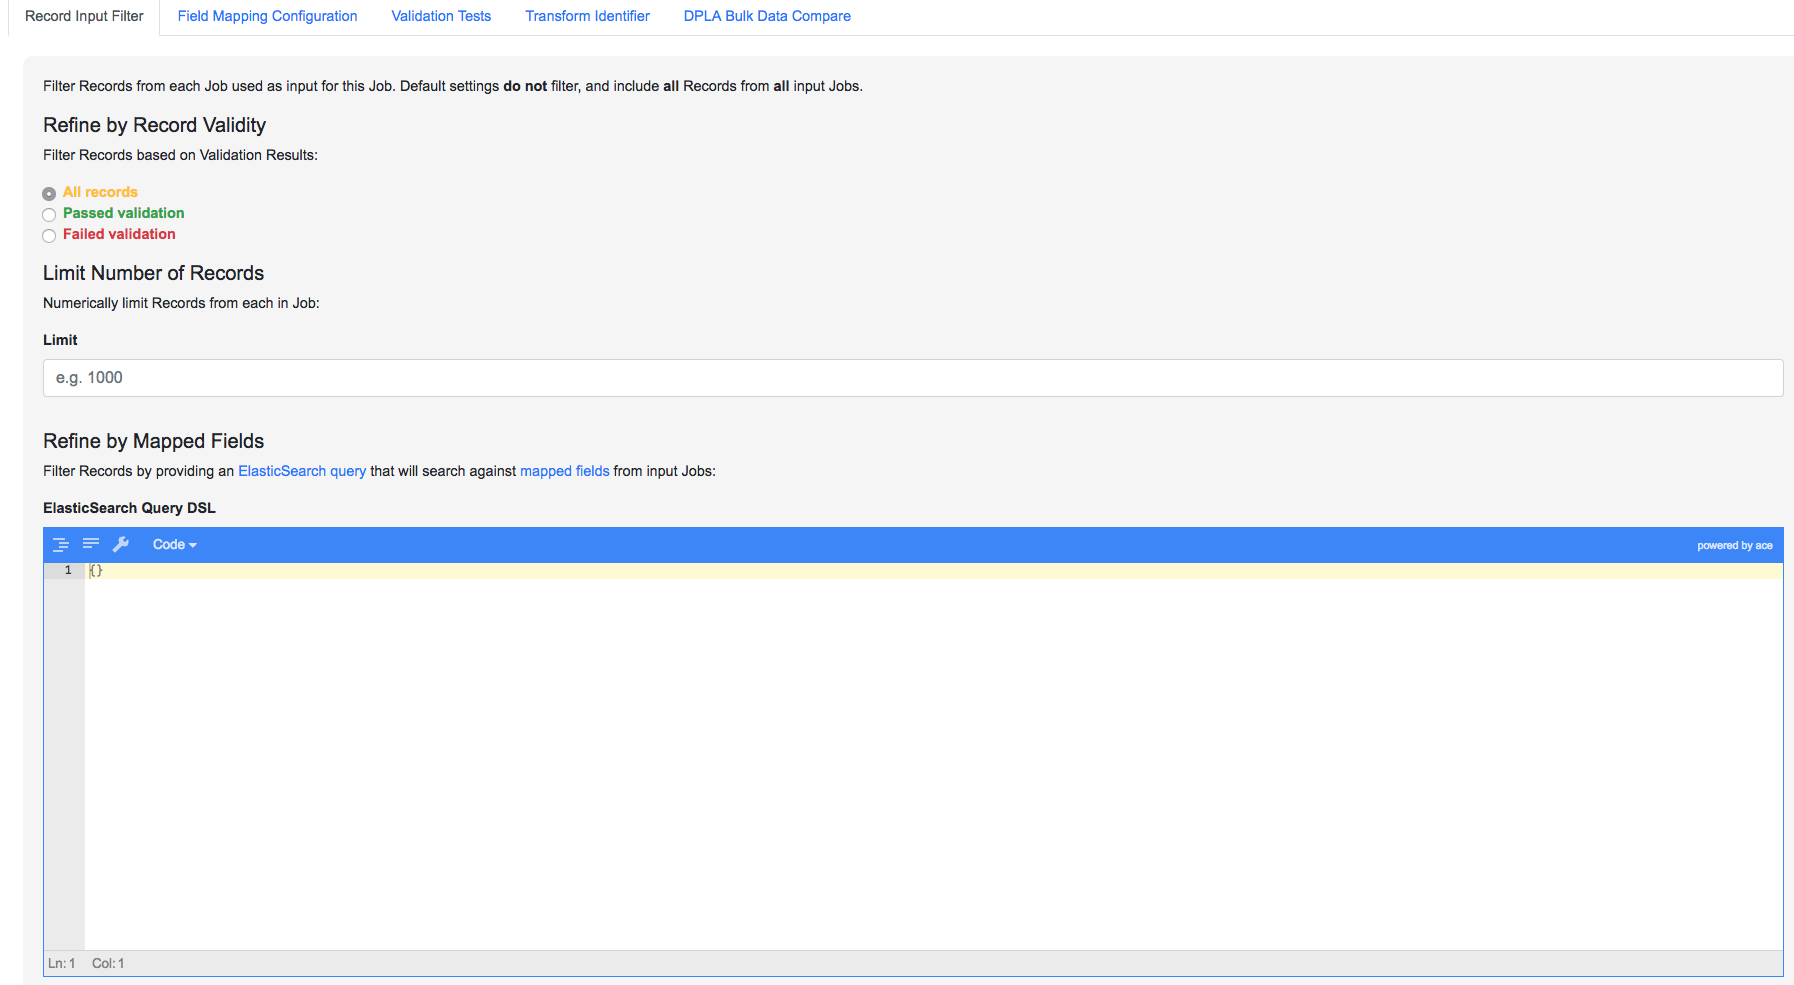
Filters that can be applied to Records used as input for a Job
For the time being, we can leave these as default. Finally, click “Run Job” at the bottom.
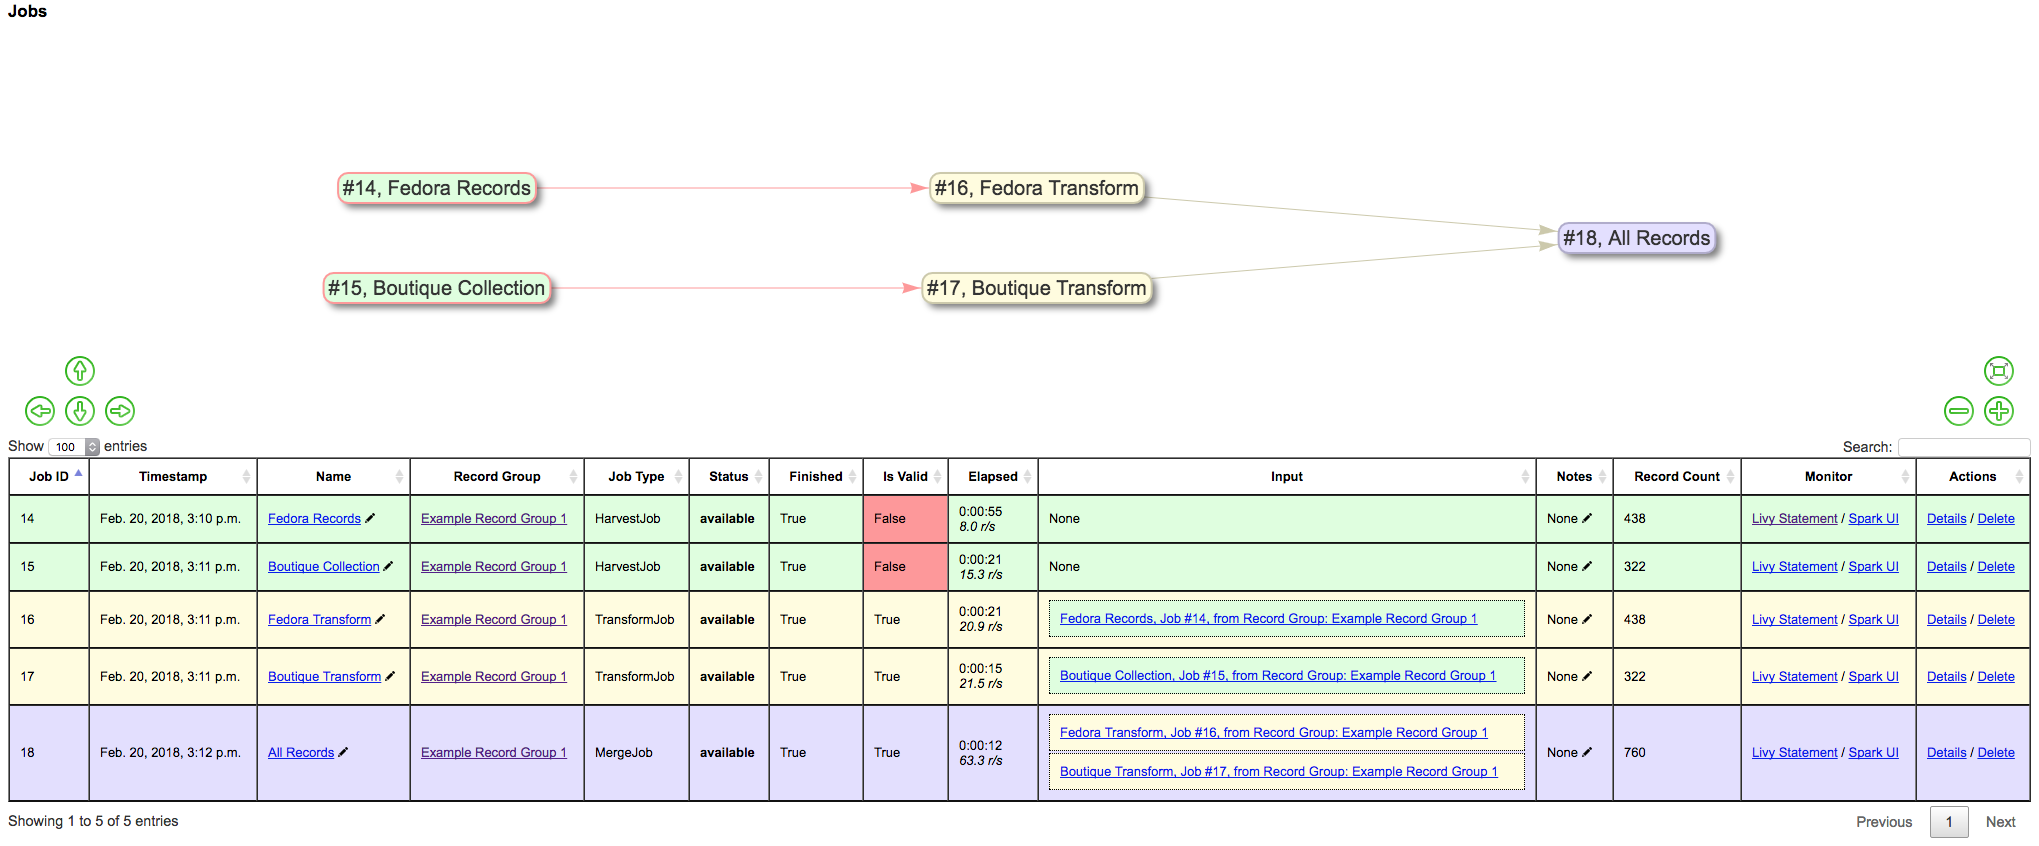
Again, we are kicked back to the RecordGroup screen, and should
hopefully see a Transform job with the status running. Note: The
graph on this page near the top, now with two Jobs, indicates the
original Harvest Job was the input for this new Transform Job.

Graph showing Transform Job with Harvest as Input, and All records sent
Transforms can take a bit longer than harvests, particularly with the
additional Validation Scenarios we are running; but still a small job,
might take anywhere from 15-30 seconds. Refresh the page until it shows
the status as available.
Also of note, hopefully the Is Valid column is not red now, and
should read True. We will look at validations in more detail, but
because we ran the same Validation Scenarios on both Jobs, this suggests
the XSLT transformation fixed whatever validation problems there were
for the Records in the Harvest job.
Looking at Jobs and Records
Now is a good time to look at the details of the jobs we have run. Let’s start by looking at the first Harvest Job we ran. Clicking the Job name in the table, or “details” link at the far-right will take you to a Job details page.
Note: Clicking the Job in the graph will gray out any other jobs in the table below that are not a) the job itself, or b) upstream jobs that served as inputs.
Job Details
This page provides details about a specific Job.
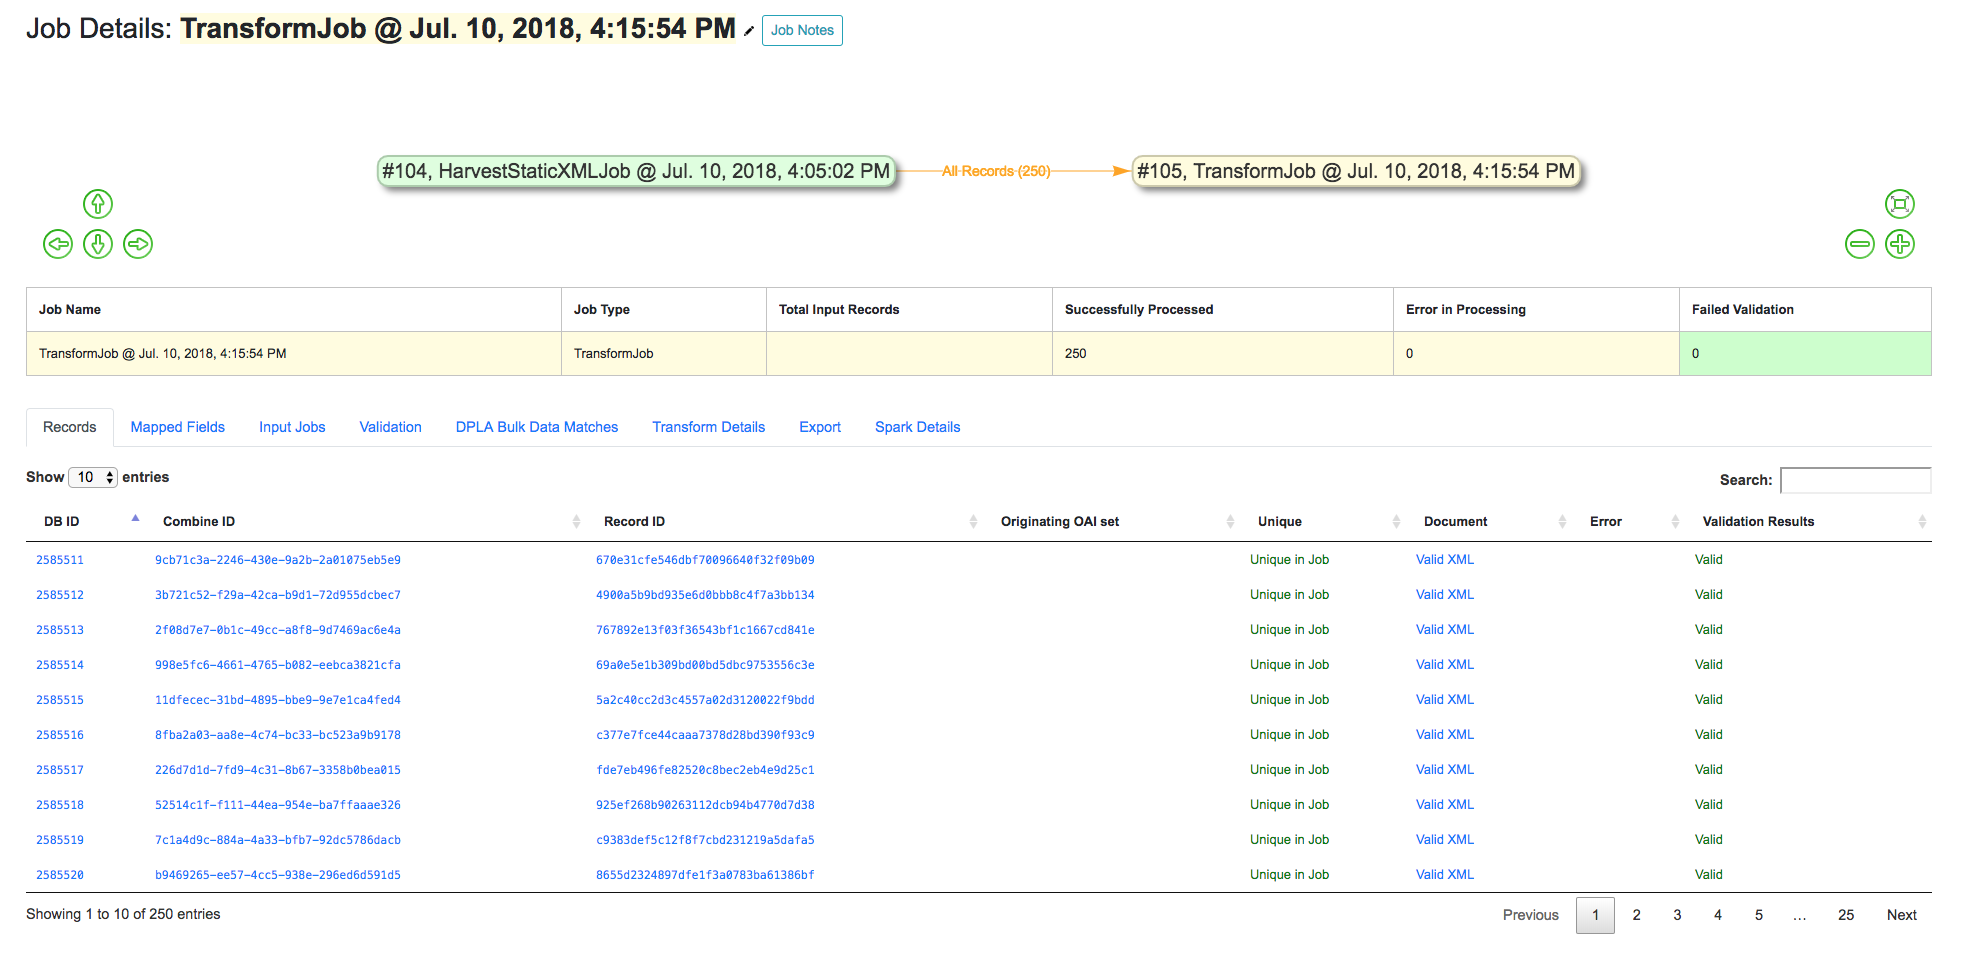
Screenshot of Job details page
Major sections can be found behind the various tabs, and include:
- Records
- a table of all records contained in this Job
- Mapped Fields
- statistical breakdown of indexed fields, with ability to view values per field
- Input Jobs
- what Jobs were used as inputs for this Job
- Validation
- shows all Validations run for this Job, with reporting
- Job Type Specific Details
- depending on the Job type, details relevant to that task (e.g. Transform Jobs will show all Records that were modified)
- DPLA Bulk Data Matches
- if run and configured, shows matches with DPLA bulk data sets
Records
Sortable, searchable, this shows all the individual, discrete Records for this Job. This is one, but not the only, entry point for viewing the details about a single Record. It is also helpful for determining if the Record is unique with respect to other Records from this Job.
Mapped Fields
This table represents all mapped fields from the Record’s original source XML record to ElasticSearch.
To this point, we have been using the default configurations for mapping, but more complex mappings can be provided when running a new Job, or when re-indexing a Job. These configurations are covered in more detail in Field Mapping.
At a glance, field mapping attempts to convert XML into a key/value pairs suitable for a search platform like ElasticSearch. Combine does this via a library xml2kvp, which stands for “XML to Key/Value Pairs” that accepts a medley of configurations in JSON format. These JSON parameters are referred to as “Field Mapper Configurations” throughout.
For example, it might map the following XML block from a Record’s MODS metadata:
<mods:mods>
  <mods:titleInfo>
      <mods:title>Edmund Dulac's fairy-book : </mods:title>
      <mods:subTitle>fairy tales of the allied nations</mods:subTitle>
  </mods:titleInfo>
</mods:mods>
to the following two ElasticSearch key/value pairs:
mods|mods_mods|titleInfo_mods|title : Edmund Dulac's fairy-book :
mods|mods_mods|titleInfo_mods|subTitle : fairy tales of the allied nations
An example of a field mapping configuration that could be applied would be the remove_ns_prefix which removes XML namespaces prefixes from the resulting fields. This would result in the following fields, removing the mods prefix and delimiter for each field:
mods_titleInfo_title : Edmund Dulac's fairy-book :
mods_titleInfo_subTitle : fairy tales of the allied nations
It can be dizzying at a glance, but it provides a thorough and comprehensive way to analyze the breakdown of metadata field usage across all Records in a Job. With, of course, the understanding that these “flattened” fields are not shaped like the raw, potentially hierarchical XML from the Record, but nonetheless crosswalk the values in one way or another.
Clicking on the mapped, ElasticSearch field name on the far-left will
reveal all values for that dynamically created field, across all
Records. Clicking on a count from the column Document with Field
will return a table of Records that have a value for that field,
Document without will show Records that do not have a value for
this field.
An example of how this may be helpful: sorting the column
Documents without in ascending order with zero at the top, you can
scroll down until you see the count 11. This represents a subset of
Records – 11 of them – that do not have the field
mods|mods_mods|subject_mods|topic, which might itself be helpful to know. This is
particularly true with fields that might represent titles, identifiers,
or other required information. The far end of the column, we can see that 95% of Records have this field, and 34% of those have unique values.

Row from Indexed fields showing that 11 Records do not have this particular field
Clicking on the button “Show field analysis explanation” will reveal some information about other columns from this table.
Note: Short of an extended discussion about this mapping, and possible value, it is worth noting these indexed fields are used almost exclusively for analysis and creating subsets through queries of Records in Combine, and are not any kind of final mapping or transformation on the Record itself. The Record’s XML is always stored seperately in MySQL (and on disk as Avro files), and is used for any downstream transformations or publishing. The only exception being where Combine attempts to query the DPLA API to match records, which is based on these mapped fields, but more on that later.
Validation
This table shows all the Validation Scenarios that were run for this job, including any/all failures for each scenario.
For our example Harvest, under DPLA minimum, we can see that there were 250 Records that failed validation. For the Date checker validation, all records passed. We can click “See Failures” link to get the specific Records that failed, with some information about which tests within that Validation Scenario they failed.

Two Validation Scenarios run for this Job
Additionally, we can click “Generate validation results report” to generate an Excel or .csv output of the validation results. From that screen, you are able to select:
- which Validation Scenarios to include in report
- any mapped fields (see below for an explanation of them) that would be helpful to include in the report as columns
More information about Validation Scenarios.
Record Details
Next, we can drill down one more level and view the details of an
individual Record. From the Record table tab, click on the
Record ID of any individual Record. At this point, you are presented
with the details of that particular Record.
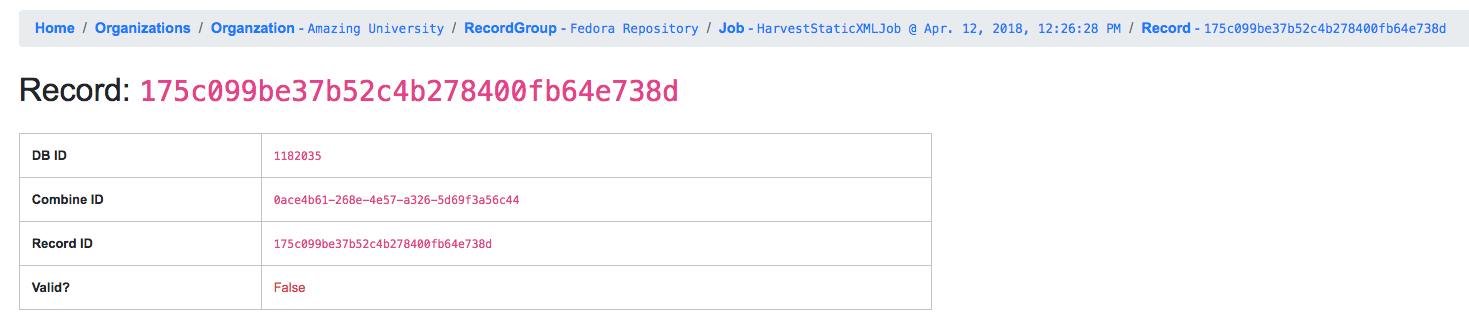
Top of Record details page, showing some overview information
Similar to a Job’s details, a Record details page has tabs that house the following sections:
- Record XML
- Indexed Fields
- Record stages
- Validation
- DPLA Link
- Job Type Specific
Record XML
The raw XML document for this Record. Note: As mentioned, regardless of how fields are mapped in Combine to ElasticSearch, the Record’s XML or “document” is always left intact, and is used for any downstream Jobs. Combine provides mapping and analysis of Records through mapping to ElasticSearch, but the Record’s XML document is stored as plain, LONGTEXT in MySQL for each Job.
Mapped Fields
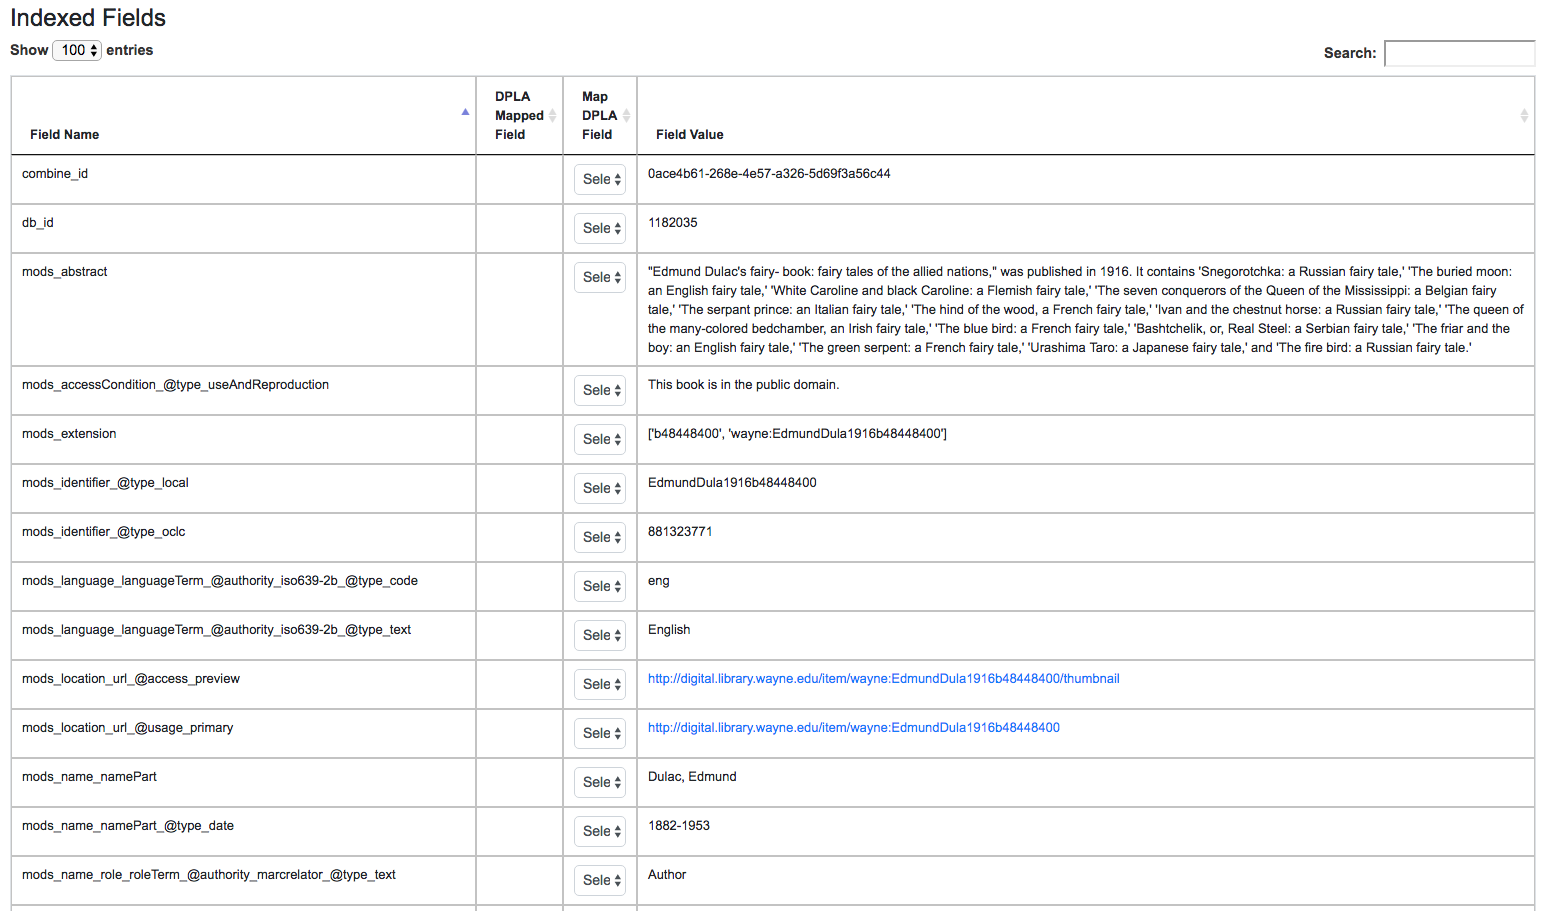
Part of table showing indexed fields for Record
This table shows the individual fields in ElasticSearch that were mapped
from the Record’s XML metadata. This can further reveal how this mapping
works, by finding a unique value in this table, noting the
Field Name, and then searching for that value in the raw XML below.
This table is mostly for informational purposes, but also provides a way
to map generically mapped indexed fields from Combine, to known fields
in the DPLA metadata profile. This can be done with the from the
dropdowns under the DPLA Mapped Field column.
Why is this helpful? One goal of Combine is to determine how metadata will eventually map to the DPLA profile. Short of doing the mapping that DPLA does when it harvests from a Service Hub, which includes enrichments as well, we can nonetheless try and “tether” this record on a known unique field to the version that might currently exist in DPLA already.
To do this, two things need to happen:
- register for a DPLA API
key, and
provide that key in
/opt/combine/combine/locasettings.pyfor the variableDPLA_API_KEY. - find the URL that points to your actual item (not the thumbnail) in
these mapped fields in Combine, and from the
DPLA Mapped Fielddropdown, selectisShownAt. TheisShownAtfield in DPLA records contain the URL that DPLA directs users back to, aka the actual item online. This is a particularly unique field to match on. Iftitleordescriptionare set, Combine will attempt to match on those fields as well, butisShownAthas proven to be much more accurate and reliable.
If all goes well, when you identify the indexed field in Combine that
contains your item’s actual online URL, and map to isShownAt from
the dropdown, the page will reload and fire a query to the DPLA API and
attempt to match the record. If it finds a match, a new section will
appear called “DPLA API Item match”, which contains the
metadata from the DPLA API that matches this record.
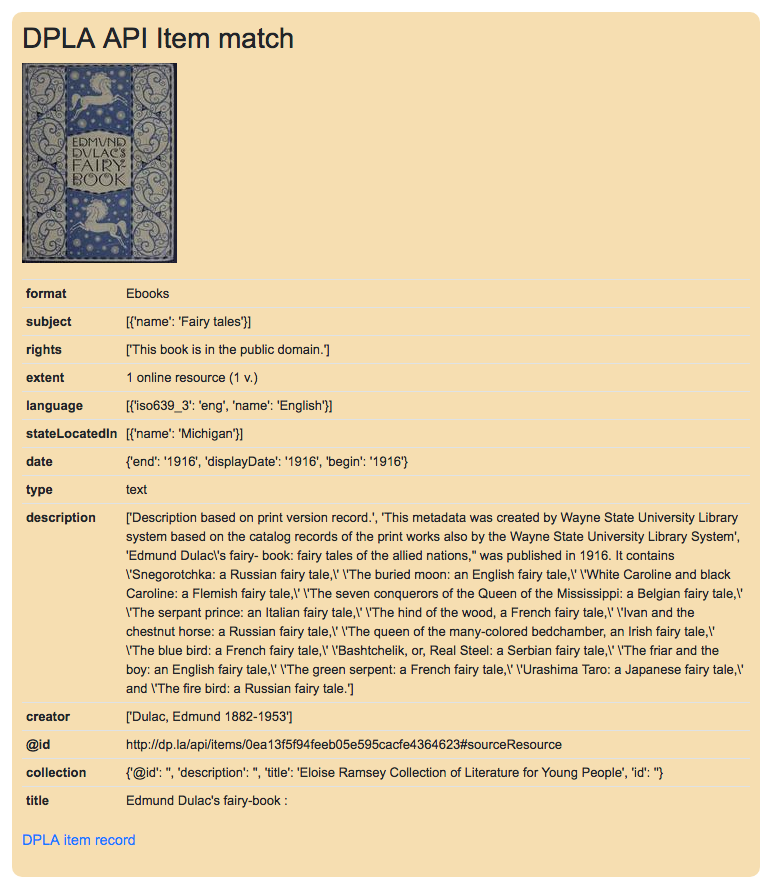
After isShownAt linked to indexed field, results of successful DPLA API query
This is an area still under development. Though the isShownAt field
is usually very reliable for matching a Combine record to its live DPLA
item counterpart, obviously it will not match if the URL has changed
between harvests. Some kind of unique identifier might be even better,
but there are problems there as well a bit outside the scope of this
QuickStart guide.
Record stages

Showing stages of Record across Jobs
This table represents the various “stages”, aka Jobs, this Record exists
in. This is good insight into how Records move through Combine. We
should see two stages of this Record in this table: one for the original
Harvest Job (bolded, as that is the version of the Record we are
currently looking at), and one as it exists in the “downstream”
Transform Job. We could optionally click the ID column for a
downstream Record, which would take us to that stage of the Record,
but let’s hold off on that for now.
For any stage in this table, you may view the Record Document (raw Record XML), the associated, mapped ElasticSearch document (JSON), or click into the Job details for that Record stage.
Note: Behind the scenes, a Record’s combine_id field is used for linking across Jobs. Formerly, the record_id was used, but it became evident that the ability to transform a Record’s identifier used for publishing would be important. The combine_id is not shown in this table, but can be viewed at the top of the Record details page. These are UUID4 in format.
Validation

Showing results of Validation Scenarios applied to this Record
This area shows all the Validation scenarios that were run for this Job, and how this specific record fared. In all likelihood, if you’ve been following this guide with the provided demo data, and you are viewing a Record from the original Harvest, you should see that it failed validation for the Validation scenario, DPLA minimum. It will show a row in this table for each rule form the Validation Scenario the Record failed, as a single Validation Scenario – schematron or python – may contain multiples rules / tests. You can click “Run Validation” to re-run and see the results of that Validation Scenario run against this Record’s XML document.
Harvest Details (Job Type Specific Details)
As we are looking at Records for a Harvest Job, clicking this tab will not provide much information. However, this is a good opportunity to think about how records are linked: we can look at the Transformation details for the same Record we are currently looking at.
To do this:
- Click the “Record Stages” tab
- Find the second row in the table, which is this same Record but as part of the Transformation Job, and click it
- From that new Record page, click the “Transform Details” tab
- unlike the “Harvest Details”, this provides more information, including a diff of the Record’s original XML if it has changed
Duplicating and Merging Jobs
This QuickStart guide won’t focus on Duplicating / Merging Jobs, but it worth knowing this is possible. If you were to click “Duplicate / Merge” link at the bottom of the RecordGroup page, you would be presented with a familiar Job creation screen, with one key difference: when selecting you input jobs, the radio buttons have been replaced by checkboxes, indicating your can select multiple jobs as input. Or, you can select a single Job as well.
The use cases are still emerging when this could be helpful, but here are a couple of examples…
Merging Jobs
In addition to “pulling” Jobs from one RecordGroup into another, it might also be beneficial to merge multiple Jobs into one. An example might be:
- Harvest a single group of records via an OAI-PMH set
- Perform a Transformation tailored to that group of records (Job)
- Harvest another group of records via a different OAI-PMH set
- Perform a Transformation tailored to that group of records (Job)
- Finally, Merge these two Transform Jobs into one, suitable for publishing from this RecordGroup.
Here is a visual representation of this scenario, taken directly from the RecordGroup page:
Merge example
Look for duplicates in Jobs
A more specific case might be looking for duplicates between two Jobs. In this scenario, there were two OAI endpoints with nearly the same records, but not identical. Combine allowed
- Harvesting both
- Merging and looking for duplicates in the Record table
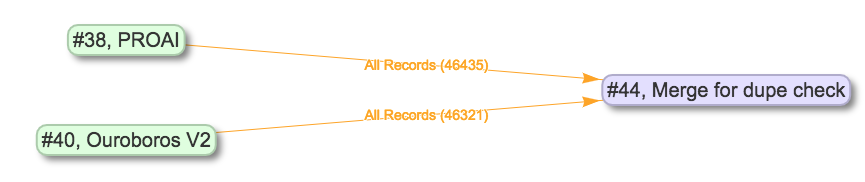
Merge Job combing two Jobs of interest
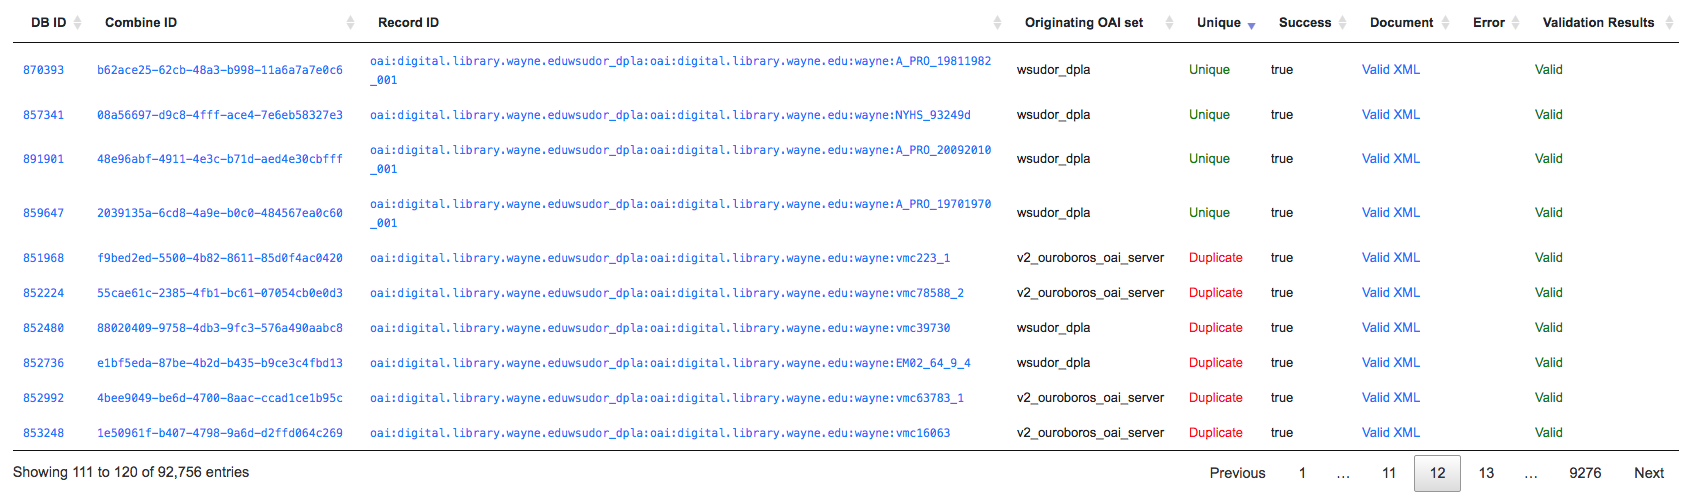
Analysis of Records from Merge Job shows duplicates
Publishing Records
If you’ve made it this far, at this point we have:
- Created the Organization, “Amazing University”
- Created the RecordGroup, “Fedora Repository”
- Harvested 250 Records from static XML files
- Transformed those 250 Records to meet our Service Hub profile
- thereby also fixing validation problems revealed in Harvest
- Looked at Job and Record details
Now, we may be ready to “publish” these materials from Combine for harvesting by others (e.g. DPLA).
Overview
Publishing is done at the RecordGroup level, giving more weight to the idea of a RecordGroup as a meaningful, intellectual group of records. When a RecordGroup is published, it can be given a “Publish Set ID”, which translates directly to an OAI-PMH set. Note: It is possible to publish multiple, distinct RecordGroups with the same publish ID, which has the effect of allowing multiple RecordGroups to be published under the same OAI-PMH set.
Combine comes with an OAI-PMH server baked in that serves all published RecordGroups via the OAI-PMH HTTP protocol.
Publishing a RecordGroup
To run a Publish Job and publish a RecordGroup, navigate to the RecordGroup page, and near the top click the “Publish” button inside the top-most, small table.

Record Group has not yet been published…
You will be presented with a new Job creation screen.
Near the top, there are some fields for entering information about an Publish set identifier. You can either select a previously used Publish set identifier from the dropdown, or create a new one. Remember, this will become the OAI set identifier used in the outgoing Combine OAI-PMH server.
Let’s give it a new, simple identifier: fedora, representing that this RecordGroup is a workspace for Jobs and Records from our Fedora
repository.
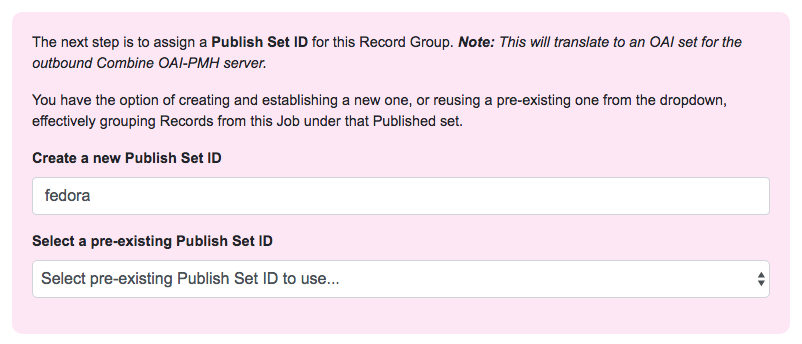
Section to provide a new publish identifier, or select a pre-existing one
Then, from the table below, select the Job (again, think as a stage of the same records) that will be published for this RecordGroup. Let’s select the Transformation Job that had passed all validations.
Finally, click “Publish” at the bottom.
You will be returned to the RecordGroup, and should see a new Publish
Job with status running, further extending the Job “lineage” graph
at the top. Publish Jobs are usually fairly quick, as they are copy most
data from the Job that served as input.
In a few seconds you should be able to refresh the page and see this Job
status switch to available, indicating the publishing is complete.
Near the top, you can now see this Record Group is published:
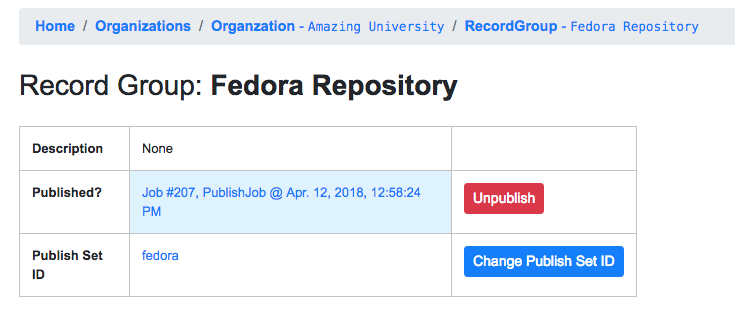
Published Record Group
Let’s confirm and see them as published records…
Viewing published records
From any screen, click the “Published” link at the very top in the navigation links. This brings you to a new page with some familiar looking tables.
At the very top is a section “Published Sets”. These show all RecordGroups that have been published, with the corresponding OAI set identifier. This also provides a button to unpublish a RecordGroup (also doable from the RecordGroup page).
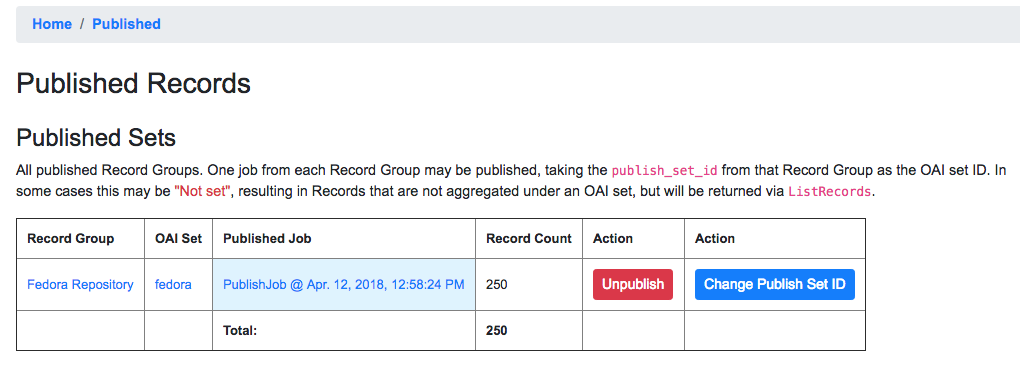
Currently published Record Groups, with their publish set identifier
To the right is an area that says, “Analysis.” Clicking this button will fire a new Analysis Job – which has not yet been covered, but is essentially an isolated Job that takes 1+ Jobs from any Organization, and RecordGroup, for the purpose of analysis – with all the Published Jobs automatically selected. This provides a single point of analysis for all Records published from Combine.
Below that is a table – similar to the table from a single Job details
– showing all Records that are published, spanning all RecordGroups
and OAI sets. One column of note is Unique in Published? which
indicates whether or not this Record is unique among all published
Records. Note: This test is determined by checking the record_id
field for published records; if two records are essentially the same,
but have different record_ids, this will not detect that.
Below that table, is the familiar “Indexed Fields” table. This table shows mapped, indexed fields in ElasticSearch for all Records across all RecordGroups published. Similar to a single Job, this can be useful for determining irregularities among published Records (e.g. small subset of Records that don’t have an important field).
Finally, at the very bottom are some links to the actual OAI-PMH serer coming out of Combine, representing four common OAI-PMH verbs:
- Identify
- basic identification of the Combine OAI-PMH server
- List
Identifiers
- list OAI-PMH identifiers for all published Records
- List Records
- list full records for all published Records (primary mechanism for harvest)
- List Sets
- list all OAI-PMH sets, a direct correlation to OAI sets identifiers for each published RecordGroup
Analysis Jobs
From any screen, clicking the “Analysis” link at the top in the navigation links will take you to the Analysis Jobs space. Analysis Jobs are a special kind of Job in Combine, as they are meant to operate outside the workflows of a RecordGroup.
Analysis Jobs look and feel very much like Duplicate / Merge Jobs, and that’s because they share mechanisms on the back-end. When starting a new Analysis Job, by clicking the “Run new analysis job” link at the bottom of the page, you are presented with a familiar screen to run a new Job. However, you’ll notice that you can select Jobs from any RecordGroup, and multiple jobs if so desired, much like Duplicate/Merge Jobs.
An example use case may be running an Analysis Job across a handful of Jobs, in different RecordGroups, to get a sense of how fields are used. Or run a battery or validation tests that may not relate directly to the workflows of a RecordGroup, but are helpful to see all the same.
Analysis Jobs are not shown in RecordGroups, and are not available for selection as input Jobs from any other screens; they are a bit of an island, solely for the purpose of their Analysis namesake.
Troubleshooting
Undoubtedly, things might go sideways! As Combine is still quite rough around some edges, here are some common gotchas you may encounter.
Run a job, status immediately flip to available, and has no records
The best way to diagnose why a job may have failed, from the RecordGroup
screen, is to click “Livy Statement” link under the Monitor column.
This returns the raw output from the Spark job, via Livy which
dispatches jobs to Spark.
A common error is a stale Livy connection, specifically its MySQL connection, which is revealed at the end of the Livy statement output by:
MySQL server has gone away
This can be fixed by restarting the Livy session.
Cannot start a Livy session
Information for diagnosing can be found in the Livy logs at /var/log/livy/livy.stderr.